 MicPlot
Open MicPlot
MicPlot
Open MicPlot
Guides › Orchestral mic plot
How to make an orchestral mic plot
A good mic plot lets the stage crew rig every stand, hang and cable run without asking you a single question. Here is what goes on one and the order to build it in.
What a mic plot is for
The mic plot is the map of a recording: a top-down drawing of the stage with every microphone placed, numbered and labelled. Several people read it, and each needs something different:
- Stagehands and the audio crew need positions, stand types and heights so they can rig before you arrive.
- The orchestra's stage manager needs to see that stands won't block walkways, risers or sightlines.
- The hall needs to know about anything flown, rigged from a catwalk or placed in the audience.
- You, at the console, need channel numbers that match the input list and the desk.
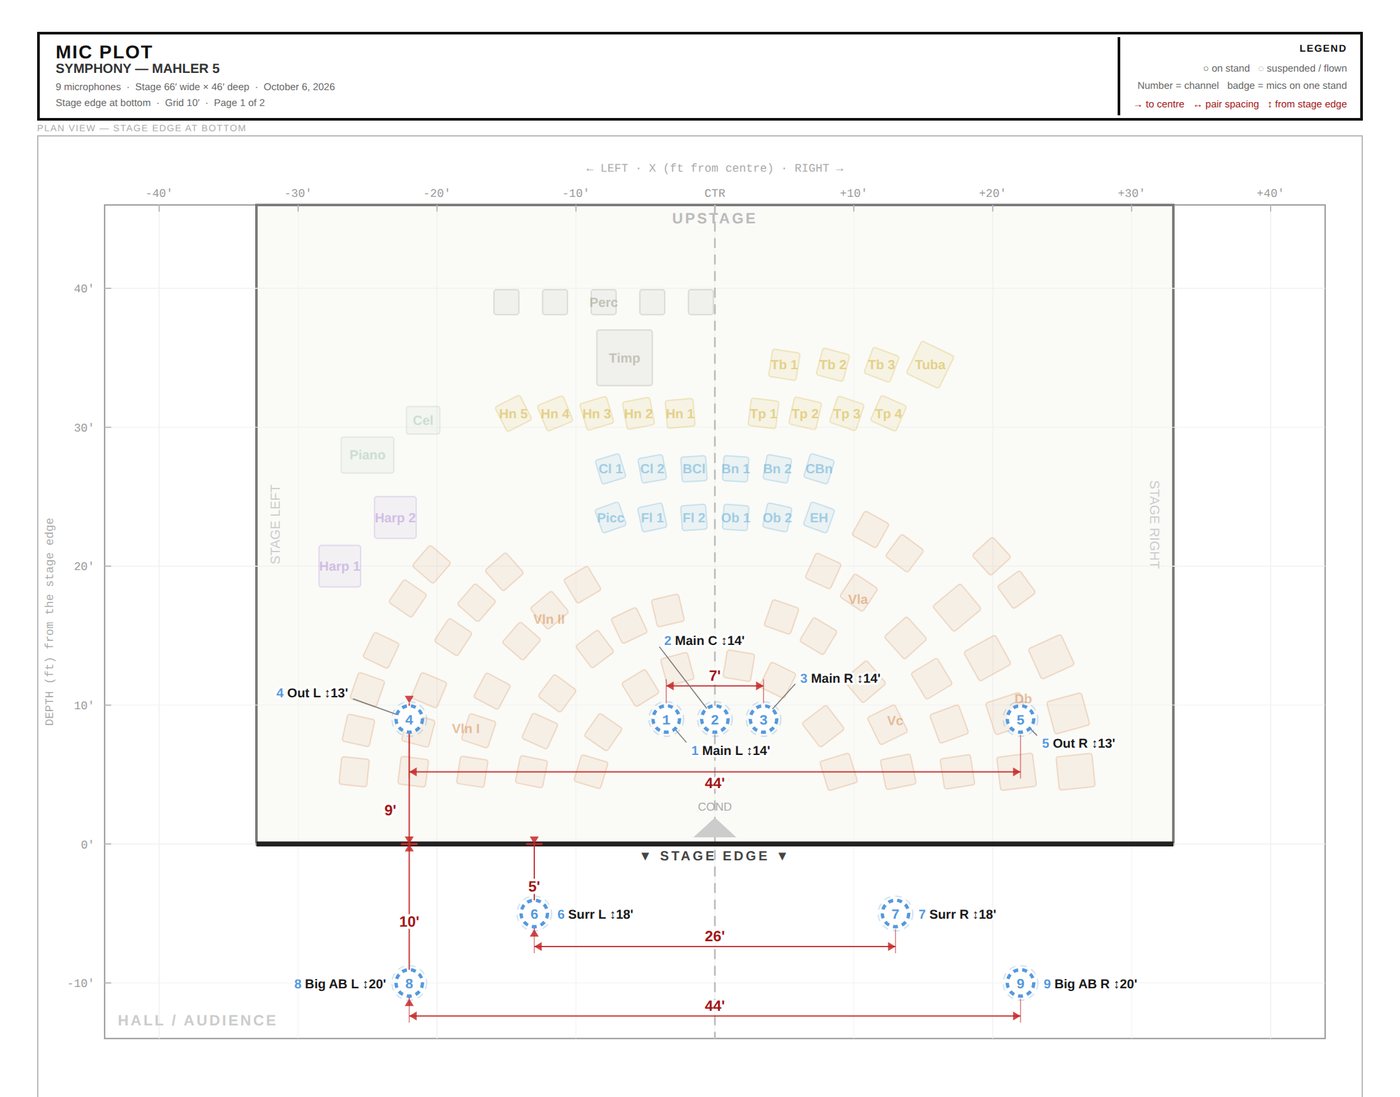
What goes on the plot
- The stage and seating: stage edge, podium, risers, any stage extension, and the seating for this program.
- Every microphone, each with its channel number, model, polar pattern where it matters, stand or rigging type, and height.
- The main pickup (a Decca tree, spaced pair, ORTF or other array) with its dimensions.
- Outriggers, spots and ambience mics, with spot mics grouped by section.
- Stage boxes and cable routes, if the crew is running cable for you.
- A title block: venue, date, program, version, and your name and phone number.
Build it in this order
- Start from the real seating. Get the setup from the orchestra's stage manager. A plot drawn on the wrong seating is the most common reason for a rig to be redone at the session.
- Place the main pickup first. Everything else supports it. For a Decca tree, start over or just behind the podium; see the Decca tree placement guide for starting dimensions.
- Add outriggers to widen the image and fill in the outer strings.
- Add spot mics section by section: woodwinds, horns, brass, timpani and percussion, harp and keyboards, then string desks and any soloists.
- Add ambience or hall mics and note how they are rigged.
- Number the channels in the same order as your input list, and keep that order from session to session.
- Measure positions the way the crew will pace them out: left or right of the centre line, and upstage or downstage of the stage edge. Write heights and stands on every mic, using one unit system for the whole plot (feet and inches, or metres), and say whether heights are from the stage floor or from a riser.
- Check sightlines. Look for camera shots, audience views, conductor sightlines and walkways players use to reach their seats.
- Print it, date it and give it a version number. Revise it after the rehearsal and send the final with your session notes.
Keep one source of truth. The mic plot, the input list and the stage plot should come from the same data, or a change made in one won't reach the others. MicPlot builds all three from a single 3D setup for that reason.
Common mistakes
- Channel numbers on the plot that don't match the input list or the console.
- Heights missing, or feet and metres mixed on the same page.
- Spots drawn where the player sits in a different setup, such as a different hall or a different program.
- No version or date, so the crew rigs from an old copy.
Make your plot in MicPlot, free
Pick a seating template, place the tree, outriggers and spots in 3D, and print the mic plot, input list and stage plot. They stay in sync. No account needed, and it works offline backstage.
Open MicPlotMore guides: Decca tree placement · Orchestral input list template